What can I do about empty spaces in my diamond painting?
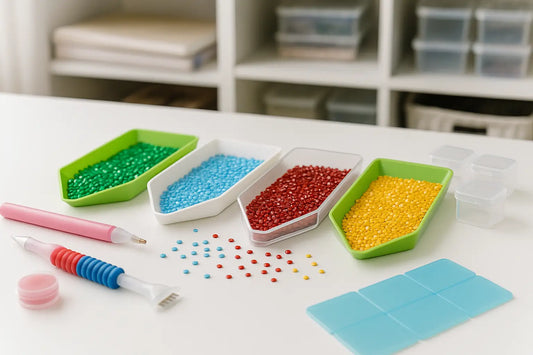
Diamond painting is a relaxing and creative hobby where you use small, sparkling gems to create a beautiful work of art. It's a perfect way to take a break from the hustle and bustle of everyday life and make something beautiful. However, a frustrating problem can arise while placing the gems: Empty spaces in diamond painting. These small holes, crooked rows or loose stones can make the final result look less neat and even detract from the shine of your work.
This problem can have several causes, such as irregularly cut drills, a weaker adhesive layer, or simply a small inaccuracy during placement. Fortunately, there are effective solutions to fill these empty spots, make the drills adhere better, and improve the adhesive layer. In this blog you’ll discover step-by-step practical tips and handy tools so your diamond painting looks perfect and professional again.

Why do empty spots appear in diamond painting?
Empty spaces in diamond painting usually occur because the stones are not lying perfectly straight, there's a tiny speck of dust or dirt on the adhesive layer, or because the stones differ slightly in size. Even a minimal deviation can cause small gaps to remain visible between the stones.
Another common cause is a weaker or uneven adhesive layer on the canvas. This can cause the diamond painting stones fall out faster or not fully align, which you'll have to correct later. Working too quickly or placing the stones without tools can also cause uneven rows.
The good news? With the right technique, careful use of your tools and regularly checking your work, you can easily prevent these problems. By taking immediate action, such as straightening the stones or improving the adhesive layer, you can prevent empty spots from remaining conspicuously visible in your final result.
Besides empty spaces in your diamond painting, do you also have trouble with drills that don't stick properly? Then read our blog What should you do if your diamond painting isn't sticking anymore? for handy tips on the to improve the adhesive layer make your work look like new again.
1. Use the back of your ergonomic pen
Many ergonomic diamond painting pens have a flat correction tool on the back, similar to a mini putty knife or spatula. This handy feature is often overlooked, but is ideal for empty spaces in diamond painting to prevent and quickly correct uneven rows.
With the flat side you can straighten several stones at once in a single motion, so they fit together perfectly and no small gaps are visible. This works especially well on larger areas of the same color, where small irregularities become more noticeable.
How to use it:
- Place the flat side carefully under or against a row of stones at a slight angle.
- Press down on the pin gently but firmly and slide the stones into the correct position.
- Check that the row is nice and tight and repeat if necessary.
💡 Extra tip: Work always in a well-lit area so you can immediately see if there are any misaligned tiles. By checking regularly as you go, you'll save yourself a lot of correction work at the end.
Make your diamond painting even easier and more precise with our Diamond Painting Pen – Ergonomic Pen. Thanks to the comfortable grip and built-in correction tool, you can place gems effortlessly and avoid gaps in your artwork.

2. Place multiple stones at once with a Multiplacer Tool
A multiplacer tool is one of the most beloved tools among diamond painters. Instead of placing each stone individually, you can use a multiplacer to place several at once. This not only saves a huge amount of time, but also ensures that the stones from the start sleek in a single straight line to be located.
The tool is particularly ideal for large areas of color or background sections, where precision and speed go hand in hand. By positioning multiple stones correctly at once, you reduce the chance of empty spaces in diamond painting and you'll need to make fewer corrections afterwards.
Benefits of the Multiplacer Tool:
- Work faster on large areas of color – ideal for monotone areas in your design.
- Less chance of gaps or misaligned rows – the stones sit perfectly right away.
- Consistent final result – you get a cleaner and more professional-looking artwork.
💡 Extra tip: Begin with a 3- or 6-placer to get the technique down. Once you have more experience, you can switch to a wider version for even faster work. Always make sure your wax is distributed evenly in the tip of the tool so the stones stick well when transferring them to the canvas.
Do you want to know which tools can help you work faster, more efficiently and enjoy your work more? Then read our blog Diamond Painting Accessories: Must-haves for a Successful Project discover which tools are essential for the best results.

3. Correct with tweezers
A tweezers is an indispensable tool in your diamond painting toolkit. It's ideal for carefully moving, removing, or repositioning loose or misaligned stones. Especially when you want to perfect small details or empty spaces in diamond painting wilt to fill in, a pair of tweezers offers the precision you need.
Tweezers are often used for diamond painting stones that fall out or when a small stone has accidentally been glued on a bit crooked. Because this lets you manipulate only one stone at a time, you have maximum control over the placement without shifting the surrounding stones.
How to use it step by step:
- Pick up the pebble carefully with the tip of the tweezers, without applying too much pressure.
- Rotate or move it to the correct position on the canvas.
- Press gently so that it bonds properly to the adhesive layer again.
💡 Extra tip: Preferably work under good lighting and use fine-point tweezers for maximum precision. If stones are stubbornly glued on crooked, you can first gently pry the stone loose and then reposition it for a perfect result.

4. Keep lines straight with a ruler or correction tool
Do you want your diamond painting to look like it came straight from a professional studio? Then keeping your stones straight is essential. Crooked rows can cause small empty spaces in diamond painting which can occur, making the final result look less neat. With a simple ruler or a special stone corrector Can you easily prevent this problem?
A ruler is ideal for neatly finishing larger surfaces, while a correction tool is specifically designed for diamond painting and often works even more precisely. Both tools ensure the stones are laid in perfect lines, giving your painting a sleek, uniform appearance.
How to use it:
- Place the ruler or correction tool Hold gently against the row of pebbles you want to align.
- Push gently so that all the little stones are neatly aligned in a single line.
- Work in small pieces to maintain optimal control and prevent the canvas from shifting.
💡 Extra tip: Controleer regularly je work? Wait must be English. Oops. Need correct. Let's craft final message properly.
For super-crisp lines in your diamond painting, a good correction tool is indispensable. View on Amazon the Diamond Painting Stone Corrector, ideal for perfectly aligning rows of stones and preventing gaps.

5. Try the checkerboard method
The checkerboard method is a simple but extremely effective technique to empty spaces in diamond painting to prevent this and to have your stones automatically align in perfect lines. This method gets its name from the chessboard pattern, where you fill the squares alternately.
How it works:
- First, take turns gluing on one gem at a time – skip every other square, just like the black-and-white squares of a chessboard.
- Then fill in the empty boxes op with the remaining stones.
Because the first tiles don't touch each other, they can 'settle' better into the adhesive layer. When you then fill the empty spaces, all the tiles fit together perfectly and there is much less chance of crooked rows or small gaps.
💡 Extra tip: This method works particularly well on large areas of a single color, but can also be useful for detailed parts to preserve precision. Optionally combine the checkerboard method with a multiplacer tool for working even faster without sacrificing quality.
Do you want even cleaner lines and less chance of gaps? Discover on our blog Diamond Painting Checkerboard Method: How to Apply This Smart Technique How this simple method makes your work immediately neater.

6. Finish off with fixative glue
Even if you worked carefully while laying the stones, it can happen that afterwards there are still small empty spaces in diamond painting zichtbaar zijn of dat sommige stones niet completely securely attached. In that case it is fixative glue the perfect solution.
Fixing glue is specifically developed for diamond painting and serves a dual function:
- It fills small gaps between the stones.
- It permanently secures all the stones so they don't come loose or shift.
How to use fixing glue:
- Make sure your painting is completely finished and dust-free.
- Apply with a soft brush or roller thin, even layer apply fixative glue over the entire canvas.
- Let it dry thoroughly according to the manufacturer's instructions.
💡 Extra tip: Use fixative glue not only as an emergency solution, but also as a preventive measure. That way your artwork will remain beautiful and glossy for years, even when framed or hung.
Would you like to know how to best protect your artwork afterwards? Then read our blog What is the best way to fix a diamond painting? and discover which methods and products ensure that your painting stays beautiful for years.
Do you want your diamond painting to stay beautiful for years without loose stones? Then use Mod Podge Clear Fixative, ideal for filling empty spaces and protecting your artwork.

Conclusion: blank spaces in diamond painting are easy to fix
Whether it's about diamond painting stones that fall out, the Filling empty spaces or the Improving the adhesive layer. Met the right tools, techniques and a little patience you can always achieve a sleek and glossy final result. By working with aids such as an ergonomic pen, multiplacer tool, tweezers, ruler, or by applying techniques like the checkerboard method, you can prevent small holes or uneven rows from forming.
Additionally, a good finish with sealing glue can ensure that your artwork stays beautiful for years and that all the gems remain firmly in place. Therefore, invest in quality tools and pay attention to accuracy when placing your gems.
💡 Remember: the better your basics and techniques, the less chance of empty spaces in your diamond painting, and the prouder you'll be of the finished result that will soon hang on the wall.
Discover on our blog 5 creative diamond painting techniques that make your work neater, faster and more enjoyable. Read all tips here and get inspired: Fun Diamond Painting Methods: 5 Creative Techniques to Try